Introduction to X11-forwarding
What’s X11-forwarding?
X11 forwarding is a software that allows for the access of graphical Linux programs remotely through an SSH client.
This tutorial describes how you can get remote Linux GUI applications via SSH to run on your local machine. Thus, you can visualize data without having to download the data from link → Discovery to your local workstation.
To get this to work you basically need an X11 server running on your local workstation. If you are a Linux or Mac user, usually you’d have X11-forwarding installed by default. If you are a Windows user, it’s recommended to download and install VcxSrv X11 server.
Installation steps
Windows Client
-
Download and install VcxSrv
-
Locate the downloaded file on your local machine and double click on it to start the installation process. Select the Yes button when the User Access Control dialog box pops up.
-
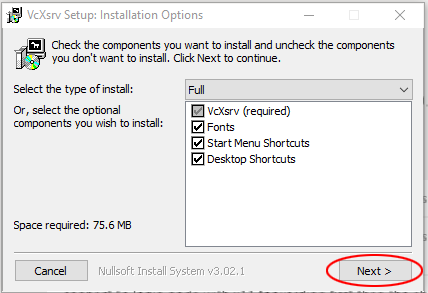
On the next window pane, you can choose to enable or disable shortcuts from being created. Click Next to continue.
-
The "Destination Folder" is where VcXsrv will be installed. Click Install to continue.

-
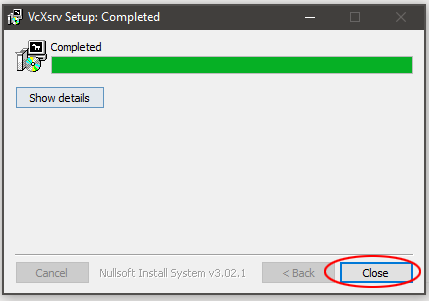
After the installation has completed, clickClose to exit the window pane.
-
MacOS Client
-
Download and install the official X server software XQuartzfor Mac.
Run X11 Server
Windows Client
-
On your windows start menu, locate and click on the XLaunch icon

-
Display Settings
-
Change the default value on Display number field from
-1to0just to maintain consistency and prevent X11 from assigning values automatically. Click Next to continue.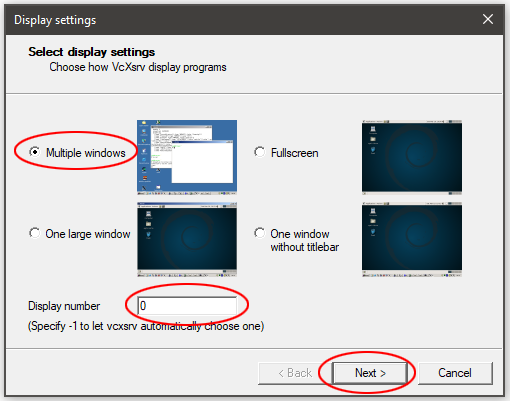
-
-
Extra settings
-
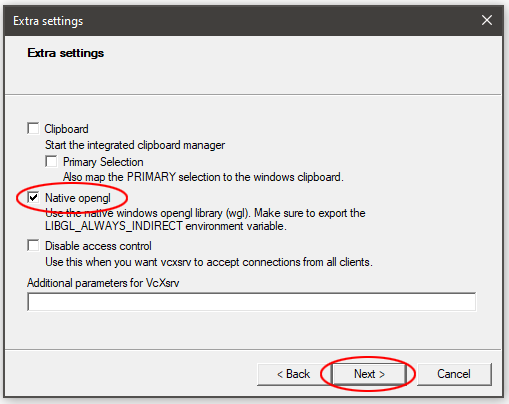
Clipboard and Primary Selection are checked by default and it’s up to you to decide whether you need it or not.
-
Also, uncheck Disable Access Control to prevent other clients on your network from using your X11 server. If enabled, this could be a potential threat where clients could spy on your network and you don’t want that.
-
Disable Access Control
-
-
Make sure
Native openglis checked to allow GPU acceleration rendering on your local workstation and Click Next to continue.
-
-
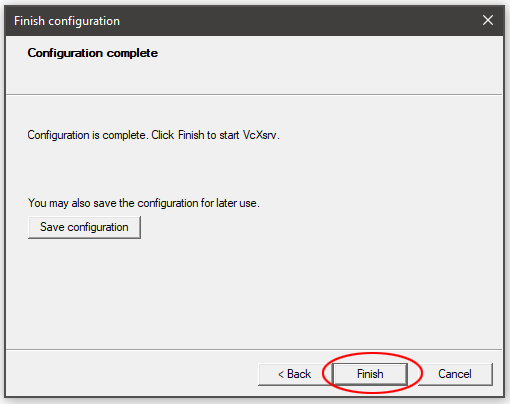
You can click on the Save Cofiguration button to use your current configuration for subsequent use of X11. Click Finish to complete the configuration.
-
On bottom right section of your taskbar, you should see the XLaunch icon which indicates that the server is actively running.

Connecting to Discovery with X11-forwarding Enabled
There are ways to connect to a remote server to enable and use X11-forwarding.
Connect via putty
-
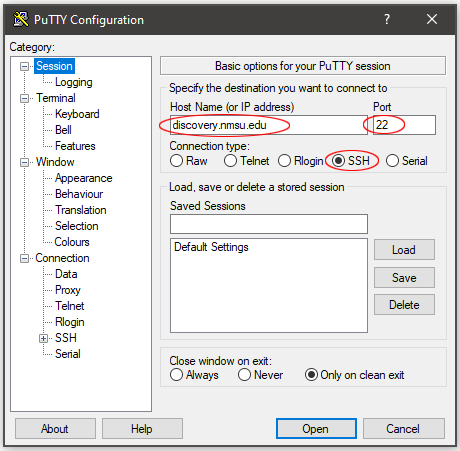
Locate and launch Putty on your local workstation.
-
Set the following parameters:
-
Host Name (or IP address): discovery.nmsu.edu
-
Port: 22
-
Connection type: SSH
-
-
-
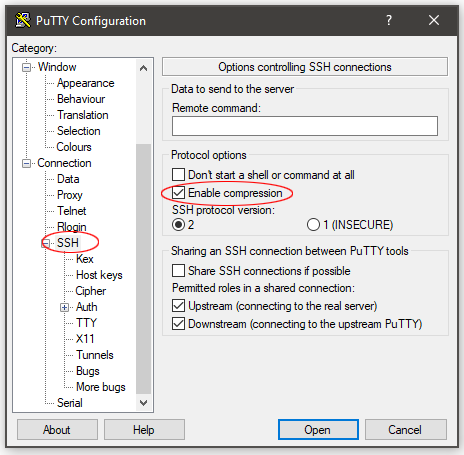
Enable compression. This requests compression of all data sent to and fro the remote server so as to speed up the interactivity between your local machine and Discovery. On the
Category:section of the window click on SSH underConnectionto display the SSH configuration. Now enable compression checking the checkbox.-
Enable compression
-
-
On the
Category:section of the window click on the + button next toSSHunderConnectionto expand the SSH menu. Now selectX11and enable X11 forwarding by checking the checkbox.-
Enable x11 forwarding
-
-
(Optional) Set the
X display locationvalue to127.0.0.1:0127.0.0.1 is the localhost address where X11 is listening and :0 is the display value.You may not need to specify the display parameter but if things aren’t working as expected, specifying it could make it work.
-
Click
Opento connect to Discovery.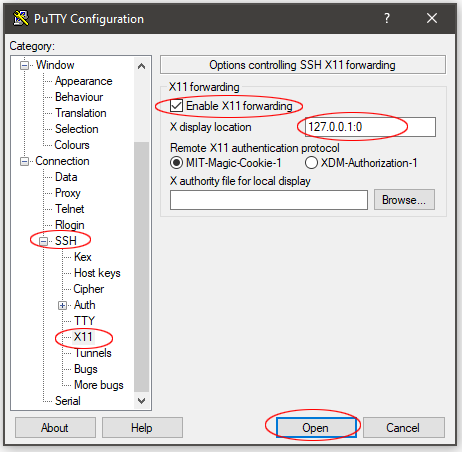
-
On the next prompt give your username followed by your password and hit the Enter key on your keyboard to log in.
-
Now that you are logged in to Discovery type the command below. SSH will automatically assign the $DISPLAY variable for X11 forwarding.
Command:
$ echo $DISPLAYOutput:
localhost:11.0If you got a similar output on your console like the one above
localhost:11.0(the number after the colon could vary. Here it’s 11). It means that X11 is working correctly but if you get a blank output then it means X11 isn’t working correctly. Then, you’d have to repeat the steps in this section from the beginning. -
To do a simple test run with xclock, open your console, type xclock and hit Enter .
Command:
$ xclockOutput:
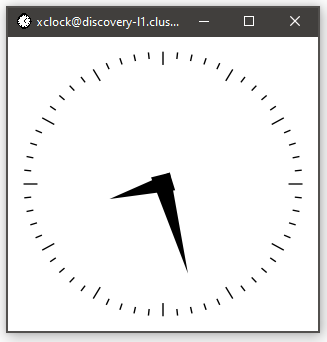
If you got a mini clock window pop up like the one above, then it means things are working the way they should.
Connect via Command Line(CLI)
Aside using putty, you can also connect to Discovery via SSH while enabling X11 forwarding using CLI:
|
To carry out this step, ensure that X11 Server is running on your local machine. |
-
Set the X11 forwarding
DISPLAYenvironmental variable on your Local workstation/ClientBefore you connect to Discovery you need to make sure that the DISPLAY environmental variable is set via the CLI on your local machine. This is done in order for your SSH session to pick it up and forward it to the remote server correctly (Discovery).
-
Linux/MacOS Terminal & Windows Command Prompt
Command:
set DISPLAY=127.0.0.1:0 -
Windows PowerShell
Command:
$env:DISPLAY="127.0.0.1:0"
127.0.0.1 is the localhost IP address where X11 is listening and :0 is the DISPLAY value.
-
-
Connect via SSH and enable X11-forwarding
After setting the DISPLAY as mentioned in Step 1, the next step is to connect via SSH with x11 forwarding enabled.
syntax: ssh -Y | -X username@discovery.nmsu.eduFlag Description Enables X11 forwarding. (Use -X when possible as it’s more secure)
Enables trusted X11 forwarding. (Quite Insecure. For windows users, it’s recommended to use PUTTY and using -Y if -X fails for the application you are trying to use.)
Command:
ssh -Y username@discovery.nmsu.edu
Enable OpenGL Remote Acceleration
For the final step, the OpenGL Remote Acceleration environmental variable on the remote server needs to be set up on→ Discovery. Hence, whenever your application goes to look for LIBGL, LIBGL will process the environmental variable and do the X11-forwarding redirection.
Command:
export LIBGL_ALWAYS_INDIRECT=1Run an Application using X11-forwarding
To show how this works, download the → QFitsView program to your /scratch/<username>  directory on Discovery with a World Coordinate System (WCS) example gls.fits file from NASA’s website. But before testing the application, please make sure that to have all the requirements working.
-
Confirm that the
DISPLAYENV is setCommand
echo $DISPLAYOutput
localhost:15.0 -
Confirm that the
OpenGLENV is setCommand
echo $LIBGL_ALWAYS_INDIRECTOutput
1 -
Download
QFitsViewand Sample.fitsfileDownload QFitsView
wget https://www.mpe.mpg.de/~ott/QFitsView/download/QFitsView_4.0Download example fits file
wget https://fits.gsfc.nasa.gov/nrao_data/samples/wcs/gls.fits -
Show list of downloaded files
ls

gls.fits  QFitsView_4.0
As you can see, there are two files in the working space, Next
-
Make the QFitsView binary executable
chmod ax QFitsView_4.0 -
Launch the QFitsView program
./QFitsView_4.0 -
Launch the QFitsView program using srun
Here,
1 CPU,1 Task,2GBof Memory for10 Minuteswere requested. Notice the--x11flag before the program you intend to execute. This informs the compute nodes(in-charge of running the job) that you are running an X11 service and for it to do the necessary forwarding.srun -p normal --cpus-per-task 1 --mem-per-cpu 2g --ntasks=1 --time=0-0:10:00 --x11 QFitsView_4.0You can also run a login shell on a compute node and execute commands interactively.
srun -p normal --cpus-per-task 1 --mem-per-cpu 2g --ntasks=1 --time=0-0:10:00 --x11 --pty bash -
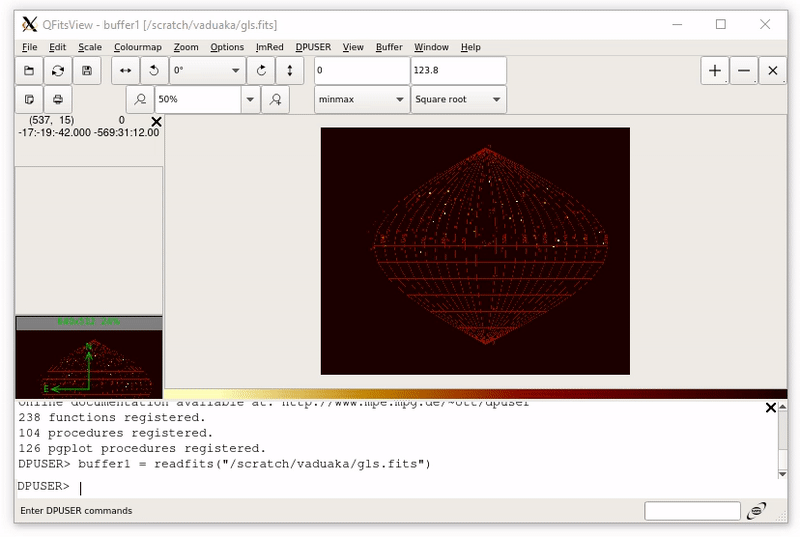
Program Output
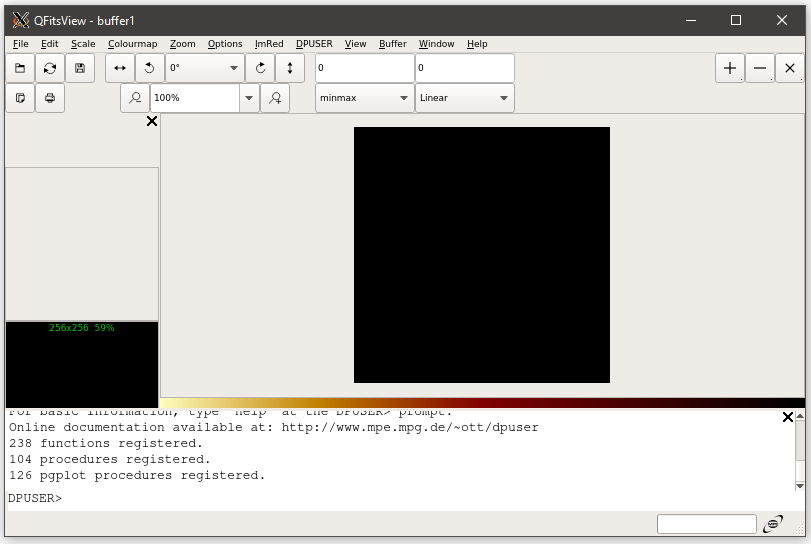
-
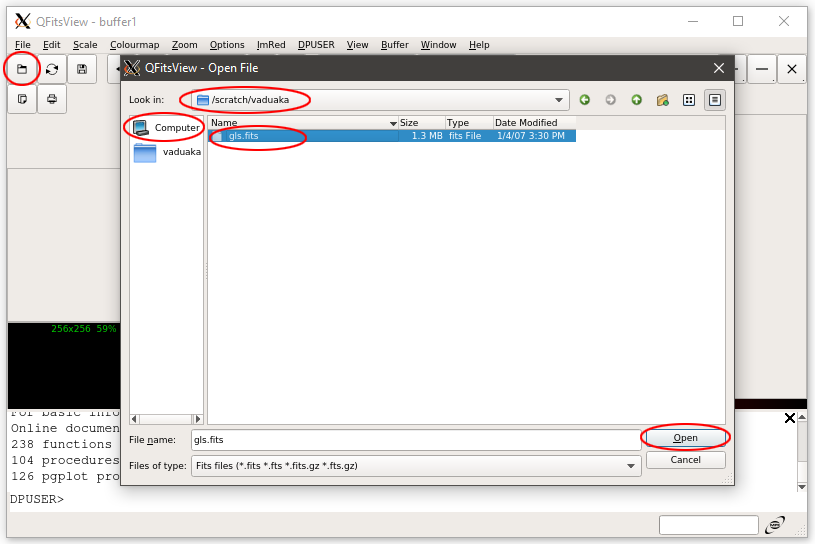
Open and view the
gls.fitsfile that’s downloaded earlierOn the menu bar navigate toFile > Open > Computer >/ > scratch > yourusername > gls.fits
-
Visualizing the data
Permanently Add Display Settings
You can permanently add the OpenGL and Font ENV variables to the .bashrc or .bash_profile file in your home directory. Hence, if you login next time, you don’t need to set it again. Add the code below at the end of your .bashrc or .bash_profile file.
Command:
# X11-forwarding display settings
if [ -n "$DISPLAY" ]; then
	export LIBGL_ALWAYS_INDIRECT=1
  export LC_ALL=C
fi